Saturday, 22 June 2013

Milk Arrowroot Biscuits

Original Recipe: http://melangerbaking.com/2011/07/13/homemade-milk-arrowroot-biscuits/

Ok, so I couldn't wait to start cooking. I have baked some Milk Arrowroot biscuits. They still need some work. it was hard to adjust the wet ingredients suitably for this recipe to get the dough just right for rolling & cutting. Hence the imperfect little flower shaped biscuits displayed on the tray. I directly swapped the icing sugar for Dextrose and added more milk & more oil. next time I will add a bit more again to try smooth out my dough. It s hard to get that crumbly pastry that isn't too crumbly!

Lorenzo seems to like them enough - which is good because they are made mainly for him. Now I just need an adult to tell me what they really think - Trent! (although I can't imagine Trent is a huge fan of the real version of these biscuits...)


{ Homemade milk arrowroot biscuit }
Original recipe by Julia @ Mélanger - edited by Darnae.

* Ingredients *
1 cup plain flour
1/2 cup arrowroot flour
1/2 cup dextrose
1/2 teaspoon baking soda
1/2 teaspoon cream of tartar
1/3 cup canola oil
45g full cream milk - but I think I added about the same amount again as I tried to get the dough to the right consistency. I May try thickened cream next time.

* Directions *
Preheat the oven to 180C/350F.  Place the flours, icing sugar, baking soda and cream of tartar in a bowl.  Mix until thoroughly combined.  With a whisk, slowly add in the cream, working the flour slightly.  Finally, add the oil to bring the mixture together.  The dough should be slightly crumbly (like shortcrust pastry), but when pinched together, hold its shape.  Transfer the dough to a lightly floured bench top and roll out to 1/3 cm (1/8 inch).  Using a cookie cutter of your choice, cut out shapes from your dough and transfer to a lined baking sheet.  You do not have to leave space between biscuits as the dough should not spread during baking.  Bake the biscuits for around 8 minutes or until they begin to slightly turn in colour.

Sugar - no more.


Before I started the Cohen's Diet, I had read some of David Gillespie's books in the "Sweet Poison" series. Basically in a nut shell it talks about how sugar is so bad for our bodies. When it contains anything other than pure glucose, the body struggles to process it and, in turn, it makes us fat and generally unwell. Fructose is the biggest offender, and it is in EVERYTHING! But fructose is ok to eat in it's natural form in fruit - but only when it is eaten in its natural state with all its fibre (ie. not juiced.)

It was an enlightening read. Trent and I have been trying to decide how to structure our eating habits in our home to try give our child(/ren) the best nutrition habits in life. Trent and I both naturally love to indulge in junk food often. We know this is a bad example and doesn't make us very happy with our bodies. It also puts us at risk of all of the nasty diseases and side effects related to obesity.

"Sweet Poison" seemed to be such a sensible solution. So before I started Cohen's diet, I decided to clean out our pantry & fridge of all our sugar (fructose) containing products. Some we kept for when we have visitors etc. but generally, everything with sugar got donated or thrown out. I have since replaced our cooking supplies with Gillespie's suggested substitute products of Dextrose and Rice Malt Syrup.

I found a great read on Sarah Wilson's blog about how bad sugar is. See this link: http://www.iquitsugar.com/is-sugar-really-that-bad-for-us/

I have not been able to experiment with these products yet, as my Cohen's diet has not allowed sugary foods (surprise, surprise!). And I have not been game enough to cook and try not to taste test my products.

Now I am nearing the end of my diet, I am getting a collection of recipes together of what I want to try cooking with my substitutes. I thought I would document them as I go.

Below is a list of recipes I want to try. I will continue to add to this list and remove them as I document the results on its own post.

Recipes I want to try:

Milk Arrowroot Biscuits
http://melangerbaking.com/2011/07/13/homemade-milk-arrowroot-biscuits/


Apple Cobbler Bars a.k.a. Newfoundland Fruit Filled Squares


Apple Cobbler Bars
http://www.nlrockrecipes.com/2013/06/apple-cobbler-bars.html


Old Fashioned Lemon Icebox Pie
http://www.nlrockrecipes.com/2013/06/old-fashioned-lemon-icebox-pie.html
Old Fashioned Lemon Icebox Pie

My Mum's Boiled Chocolate Cake

Pavlova


Strawberry Chiffon Squares


Strawberry Chiffon Squares
http://www.nlrockrecipes.com/2010/01/strawberry-chiffon-squares.html


Auntie Crae's Plantation ChewsThe Absolute Best Coconut Cream Pie


Auntie Crae's Plantation Chews
http://www.nlrockrecipes.com/2012/06/auntie-craes-plantation-chews.html


Coconut Cream Pie
http://www.nlrockrecipes.com/2007/11/best-coconut-cream-pie.html

My mouth was watering reading this recipe!!!
Photo: Finally!! I FOUND it! DONT want to lose this again - DON'T be like me! SHARE to save this on your wall!! =D 

You won't believe it!!!!!!
NO FLOUR, NO OIL, NO WHITE SUGAR
Peanut Butter Chocolate Chip Cookie Dough Bites

**SHARE so it will save in your timeline**

Ingredients:
1 1/4 cups canned* chickpeas, well-rinsed and patted dry with a paper towel
2 teaspoons vanilla extract
1/2 cup + 2 tablespoons (165 grams) natural peanut butter (can use PB2 from gym to make healthier, check your labels)
1/4 cup (80 grams) honey (agave would be amazing too!)
1 teaspoon baking powder**
a pinch of salt if your peanut butter doesn’t have salt in it
1/2 cup (90 grams) chocolate chips

* My can was a 400 gram can, 240 grams without the water, and I used all but a few tablespoons

** If you need grain-free baking powder, you can use 1 part cream of tartar + 1 part baking soda + 2 parts arrowroot.

Directions:
Preheat your oven to 350°F / 175°C.

Combine all the ingredients, except for the chocolate chips, in a food processor and process until very smooth. Make sure to scrape the sides and the top to get the little chunks of chickpeas and process again until they’re combined.

Put in the chocolate chips and stir it if you can, or pulse it once or twice. The mixture will be very thick and sticky.

With wet hands, form into 1 1/2″ balls. Place onto a piece of parchment paper. If you want them to look more like normal cookies, press down slightly on the balls. They don’t do much rising. Bake for about 10 minutes.

Yields about fourteen 1 1/2″ cookie dough balls.
*** Don't even try with regular peanut butter! They'll come out oily. You MUST use natural peanut butter. 

~PLEASE SHARE~
to SAVE this recipe, be sure to click SHARE so it will store on your personal page.
Click and join us here~for more everyday fun, tips, recipes, weight loss support &
motivation  http://goo.gl/5TTR8


Peanut Butter Chocolate Chip Cookie Dough Bites
(couldn't find link on FB so just copied the details here)

 Ingredients:
1 1/4 cups canned* chickpeas, well-rinsed and patted dry with a paper towel
2 teaspoons vanilla extract
1/2 cup + 2 tablespoons (165 grams) natural peanut butter (can use PB2 from gym to make healthier, check your labels)
1/4 cup (80 grams) honey (agave would be amazing too!)
1 teaspoon baking powder**
a pinch of salt if your peanut butter doesn’t have salt in it
1/2 cup (90 grams) chocolate chips

* My can was a 400 gram can, 240 grams without the water, and I used all but a few tablespoons

** If you need grain-free baking powder, you can use 1 part cream of tartar + 1 part baking soda + 2 parts arrowroot.

Directions:
Preheat your oven to 350°F / 175°C.

Combine all the ingredients, except for the chocolate chips, in a food processor and process until very smooth. Make sure to scrape the sides and the top to get the little chunks of chickpeas and process again until they’re combined.

Put in the chocolate chips and stir it if you can, or pulse it once or twice. The mixture will be very thick and sticky.

With wet hands, form into 1 1/2″ balls. Place onto a piece of parchment paper. If you want them to look more like normal cookies, press down slightly on the balls. They don’t do much rising. Bake for about 10 minutes.

Yields about fourteen 1 1/2″ cookie dough balls.
*** Don't even try with regular peanut butter! They'll come out oily. You MUST use natural peanut butter.


Amazing Tomato Basil Pasta


 Amazing Tomato Basil Pasta
(not a sugar recipe - but I want to try this with Spelt or GF pasta)
 http://myfridgefood.com/ViewRecipe.aspx?recipe=21011


Almond Joy Coconut Brownies - By Katrina Smith.


Thursday, 20 June 2013

The Diet

On the 24th of March 2013, I bit the bullet and began Dr Cohen's diet. This came after trying to avoid it as much as I could knowing full well it was something that would definitely work after having witnessed Trent lose so much weight on it only a year earlier. It was just so hard! I saw what he was allowed to eat - I had to prepare and make it all for him.

Dr Cohen's diet is amazing. Its a calorie based diet that is tailored to individuals through blood tests. Dr Cohen prescribes an eating plan for you showing specifically what you should eat in terms of weights and lists of proteins, vegetables and fruits that are permissible to use. Not only do you lose weight rapidly on this diet, but the diet helps balance out your Human Growth Hormone, Insulin and Serotonin Levels.

After having Lorenzo last year, I was hovering around 77-75kgs for a long time. I was about 67kgs when I got pregnant. I felt awful. I was still wearing a lot of my maternity clothes because my old clothes did not fit me. I tried another diet in February after I had finished breast feeding. I successfully lost 6kgs, but put it all back on very quickly as it was not the best diet for me and I went straight back to binge eating after completing the program.

When Trent suggested I do Cohen's diet, I was very hesitant because I knew how hard it was and that they would expect me to lose more weight than I really thought I needed to (or could be bothered to). But after thinking about it for a day, I realised it was what I needed. The structure of a healthy diet and the support given by the clinic along with the accountability of blood tests were all great motivators to try this diet out.

On the 24th of March 2013, I weighed 74.7kgs.

Twelve and a half weeks later on the 20th of June 2013, I reached my goal weight (by cracking 60kgs) of 59.6kgs.

The diet did not come without it's challenges. I couldn't eat out. I had to prepare everything I put in my mouth. My Sister's wedding was on two weeks after I began the diet, and I could not eat a thing at the reception. Instead I had a packed dinner to eat in the car between the ceremony & reception. Mother's Day lunch, mother's group morning teas, any activity involving food was a challenge that I had to overcome and be prepared for.

I did do 3 major cheats during the 12 weeks of some Fish & Chips, and each time I paid for it with the scales going up and my cravings going rampant for a few days, but then I would get back on track, see those scales go down and keep motivated!

Not only did I lose all my baby weight, but I got down to the smallest weight I have ever been in my adult life! Previously to this, I was 63kgs at my wedding, and I got down to 61kgs about 6 months after that. Then it was a slow incline over 3 years until I got pregnant at 67kgs.

Yesterday (20/06/13) I began my "Re-feeding" phase of the diet which helps me re-introduce richer foods into my diet over 3 weeks, then after this period I will be taught at the clinic how to maintain my weight.

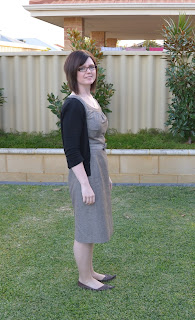
I just wanted to document my weight loss on this blog because I have never been so proud of myself! This is one of the greatest achievements of my life. I never would have thought I could get below 60kgs. Trent has been my biggest support. I love him so much! He has always seen so much potential in me in so many areas of my life. His encouragement in my life for the past 5 years has turned me into someone I like a lot more than I ever have in the past. And that says a lot! Thank you so much! x 

Me on 24 March 2013 (74.7kgs)                                        


Me on 17 June 2013 (60.2kgs)


Me on 23 June 2013 (59.2kgs - yep I lost more!)